
")
The whirring of propellers, the rush of wind beneath your fingertips as you pilot a machine through the air – the world of drone flying offers an unparalleled sense of freedom and exploration. But what if we told you that this exhilarating experience wasn't limited to the realm of pre-built, high-priced drones? With a little know-how and readily available components, you can transform the dream of crafting your own drone into a thrilling reality.
This comprehensive guide is your roadmap to becoming a DIY drone builder. Forget about complex, specialized parts; we'll be focusing on readily available, off-the-shelf components – many of which you can find conveniently on platforms like Amazon. No prior experience is needed, just a curious mind and a desire to learn.
Over the following sections, we'll break down the entire process, from selecting the perfect parts for your needs to meticulously assembling your drone and finally, achieving that exhilarating first flight. We'll delve into the functions of each component, explain the assembly process step-by-step, and equip you with the knowledge to calibrate and fine-tune your creation.
Whether you're a photography enthusiast looking to capture breathtaking aerial shots, a tech whiz fascinated by the world of robotics, or simply someone who craves the thrill of piloting your own machine, building your own drone offers a unique blend of challenge, reward, and endless possibilities. So, if you're ready to embark on this exciting adventure, buckle up and get ready for takeoff! Let's turn the dream of drone flight into a tangible reality, one step (and component) at a time.
Before we begin, a word of caution: Responsible drone operation is crucial. Familiarize yourself with local drone regulations in your area. Always prioritize safety by flying in open spaces, away from crowds and obstacles.
Now, let's get your DIY drone project off the ground!
Essential Components for Your Drone Build:
You can directly order these components from Amazon using the link given.
- F450 Quadcopter Frame (Flamewheel F450): The backbone of your drone, this frame offers a sturdy and reliable platform for mounting all the other components. It's crafted from high-quality glass fiber and polyamide nylon, ensuring durability during flight. Look for pre-threaded brass sleeves for easy assembly and colored arms for better orientation while flying. buy here
- A2212 1400KV Brushless Motor: The heart of your drone, brushless motors provide efficient power for flight. This A2212 1400KV motor is ideal for medium-sized quadcopters with propellers in the 8-10 inch range. It boasts a 3.17mm shaft diameter and a lightweight design for optimal performance. buy here
- SoloGood 1045 Propellers: These 10x4.5-inch propellers are the perfect match for your F450 frame. They come in a convenient set of 16 (8 clockwise [CW] and 8 counter-clockwise [CCW]), ensuring balanced flight. Made from a lightweight and high-strength material, these propellers are built to endure while minimizing noise during operation. buy here
- Spektrum Avian 30-Amp Smart Lite Brushless ESC: An Electronic Speed Controller (ESC) controls the speed and direction of each motor. This Spektrum Avian 30-Amp ESC supports 2S to 4S LiPo batteries and features convenient IC3 connectors for simplified wiring (no soldering required!). buy here
- Spektrum 11.1V 2200mAh 3S 50C Smart LiPo Battery: This high-performance Lithium Polymer (LiPo) battery provides the power your drone needs. 2200mAh capacity and a 50C continuous discharge current ensure extended flight times. The integrated Smart technology allows for effortless charging and monitoring. buy here
- Pixhawk PX4 Flight Controller: The brain of your drone, the flight controller maintains stability and controls flight characteristics. The Pixhawk PX4 is a reliable option featuring a powerful 32-bit processor, a safety switch, a buzzer, and the ability to connect with various expansion modules. buy here
- Flysky FS-i6 6CH RC Transmitter with FS-iA6B Receiver: This 2.4GHz transmitter and receiver combo allows you to take complete control of your drone. With 6 channels, it's suitable for a variety of multirotor configurations, including your new quadcopter! buy here
Assembling Your Drone:
- Frame Assembly: Carefully follow the manufacturer's instructions to assemble the F450 frame. Secure all screws and connections to ensure a rigid structure.
- Motor & Propeller Attachment: Mount the A2212 motors onto the designated arms of the frame. Ensure proper CW and CCW motor placement according to the manual. Carefully attach the SoloGood propellers, ensuring they are firmly secured. Double-check the direction of each propeller (CW vs CCW).
- ESC & Flight Controller Connection: Connect the Spektrum Avian ESCs to the Pixhawk flight controller using the designated ports. Refer to the specific pin configuration for each component in the respective manuals.
- Battery Installation: Carefully slide the Spektrum LiPo battery into the designated compartment on the frame. Connect the battery to the appropriate power connector on one of the ESCs.
- Transmitter & Receiver Binding: Following the Flysky FS-i6 manual, bind the transmitter to the FS-iA6B receiver. This process creates a unique communication link between your controller and the drone.
- Flight Controller Mounting: Securely mount the Pixhawk flight controller onto the frame using double-sided tape or other recommended fasteners.
Assembling the Brains of Your Drone: The Pixhawk Flight Controller
The Pixhawk flight controller acts as the heart of your drone, processing sensor data and controlling flight characteristics. This section dives into the assembly process specifically for the Pixhawk PX4 2.4.8 with its accompanying kit containing:
- 1x Pixhawk PX4 2.4.8 Flight Controller with Shell
- 1x Safety Button
- 1x Shock Absorber for Pixhawk Board
- 1x NEO-M8N GPS Module
- 1x Power Module (T-Plug type)
- 1x 3DR Radio Data Transmission Module (915MHz)
- 1x GPS Bracket
- 1x Buzzer

Safety First!
Before we begin, ensure you have a clean, well-lit workspace and all the necessary components. Double-check that your Pixhawk kit includes all the listed items.
Mounting the Pixhawk:
- Shock Absorption: The included shock absorber helps isolate the Pixhawk from vibrations caused by motor rotation. Attach the shock absorber to the designated location on the Pixhawk flight controller using the provided double-sided tape or other recommended fasteners.
- Pixhawk Shell: Carefully slide the Pixhawk flight controller into the provided protective shell. The shell offers additional structural support and protects the delicate components from minor impacts.
- Securing the Setup: Locate a suitable mounting location on your drone frame for the Pixhawk and shock absorber assembly. Many frames have designated mounting holes for flight controllers. Use double-sided tape, zip ties, or other appropriate fasteners to securely mount the Pixhawk assembly onto the frame, ensuring minimal vibration.
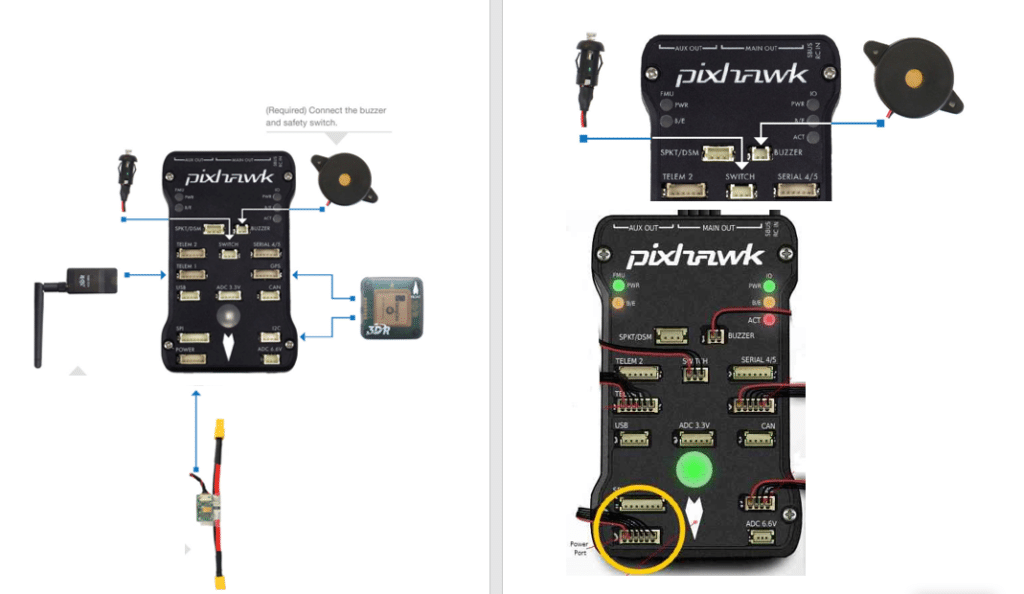
Connecting the Pixhawk Crew:
- Safety Button: The safety button is a critical component that allows you to disarm the motors in case of an emergency. Locate the designated port on the Pixhawk for the safety button and connect the included button using the provided cable.
- Power Delivery: The included power module simplifies the power connection process. Connect the power module's T-Plug connector to a designated power output from one of your Electronic Speed Controllers (ESCs). Then, connect the power module's main cable to the appropriate power port on the Pixhawk.
- Data Transmission: The 3DR radio module enables communication between your Pixhawk flight controller and your ground control station (computer with mission planning software). Connect the 3DR radio module to the TELEM1 port on the Pixhawk using the provided cable. Note: Ensure your chosen ground control station software is compatible with the 3DR radio protocol.
- GPS and Buzzer: The NEO-M8N GPS module provides the Pixhawk with essential location data for navigation and flight stability. Connect the GPS module to the designated GPS port on the Pixhawk using the provided cable. Mount the GPS module on a separate location on your drone frame using the included GPS bracket, ensuring a clear view of the sky for optimal signal reception. Finally, connect the included buzzer to the designated buzzer port on the Pixhawk. The buzzer provides audible feedback during flight and can be helpful for locating your drone if it lands in tall grass or a concealed area.
Calibrating your Drone:
- Flight Controller Calibration: Software like Ardupilot or Betaflight is commonly used for configuring and calibrating your flight controller. Download and install the appropriate software on your computer according to your chosen flight controller (Pixhawk in this case). Connect the Pixhawk to your computer using a USB cable. The software will guide you through a series of calibration steps, including accelerometer, gyroscope, compass, and ESC calibration. Follow the on-screen instructions meticulously to ensure precise control during flight.
- Remote Control Calibration: Your Flysky FS-i6 transmitter likely has built-in calibration options. Refer to the transmitter's manual to access these settings and ensure all control sticks and switches function correctly.
- Receiver Failsafe Setup: A failsafe is a critical safety feature. It defines what the drone should do in case the signal from the transmitter is lost. Set the failsafe in your flight controller software to a safe action, such as disarming the motors and gently descending the drone.
- Basic Tuning: Flight controller software often allows for basic tuning adjustments. This might involve modifying settings like motor idle speed and flight modes. It's recommended to start with the default settings for your chosen flight controller and make minor adjustments gradually as you gain experience flying your drone.
Pre-Flight Check:
Before every flight, perform a thorough pre-flight check to ensure the safety of yourself and others around you. Here's a quick checklist:
- Visual Inspection: Carefully examine the drone frame, motors, propellers, and wiring for any damage or loose connections.
- Battery Level: Verify that the battery is fully charged and securely fastened within the frame compartment.
- Propeller Direction: Double-check that all propellers are correctly attached and spinning in the designated direction (CW or CCW).
- Control Surface Movement: Power on the transmitter and receiver. Move the control sticks and switches on the transmitter and observe the corresponding movements on the control surfaces of the drone (motor response, etc.).
- Flight Mode Check: Verify that the flight mode switch on your transmitter is set to the desired mode (usually "stabilized" for beginners).
Taking Flight:
- Find a Safe Location: Choose a wide-open space free from obstacles, people, and animals for your maiden flight. Ensure there are no obstructions overhead and avoid flying near power lines or buildings.
- Arming the Motors: Once confident with the pre-flight check, follow the instructions in your flight controller software to arm the motors. This typically involves a specific sequence of switch movements on your transmitter.
- Gentle Takeoff: Slowly apply throttle with the right stick on your transmitter. The drone should begin to ascend. Maintain a low altitude and experiment with gentle control movements to get a feel for the drone's responsiveness.
- Landing: Slowly reduce throttle and ease the drone back down to the ground. Disarm the motors using the designated switch on your transmitter once safely landed.
Congratulations! You've successfully flown your very own DIY drone! Remember, practice makes perfect. Start with short, controlled flights in a safe environment and gradually increase flight time and complexity as you gain experience and confidence.
Here are some additional tips for a successful and enjoyable drone flying experience:
- Always prioritize safety. Fly responsibly and stay within the visual line of sight.
- Start slow and be patient. Learning to fly a drone takes time and practice. Don't get discouraged if you don't master it right away.
- Familiarize yourself with local drone regulations. Rules and restrictions can vary depending on your location.
- Join a drone flying community. Connect with other drone enthusiasts to share experiences, learn new skills, and find safe flying locations.
With dedication and these helpful steps, you can embark on a thrilling journey into the world of drone piloting! If you have any questions feel free to reach out to us at contact@inphoenixaviation.com and also don't forget to check our website Inphoenix Aviation.